Showing posts with label tasker project. Show all posts

Tasker Tutorial: Monitor Daily Call and Data Account Balance

June 12, 2016
This is an extremely simple yet effective way to keep track of your daily call & data balances. It also helps you monitor any unnatural balance deductions, which sometimes happens due to technical glitch of the telecom operators.

Most telecom operators allow you to send a keyword via a toll free SMS to get information about your call and data balances. To find out about SMS codes of your operator, please contact your customer care or try a google search.

For instance, Reliance Communications allows its users to send a SMS at 55333 with the text BAL or MBAL to receive call and data balance information respectively.

Step 1: Under the PROFILES tab, Click on the '+' icon and select Time.

Use the following settings:
  • From: 11:45 pm
  • Repeat: unchecked (inactive)
  • To: 11:50 pm
Press the back button to save.

Step 2: In the next pop-up menu, Select New Task + , type Send SMS and proceed.

Step 3: Inquiring Call Balance:  Press the + icon and select Phone -> Send SMS

Use the following settings:
  • Number: *Use the number provided by your telecom operator at which the SMS needs to be sent.* eg. 55333 in case of Reliance communications.
  • Message: *Use the keyword provided by your telecom operator.* eg. BAL in case of Reliance communications.
Press the back button to save.

Step 4: Press the + icon and select Task -> Wait. Use the slider and select 1 minute.

Step 5: Inquiring Data Balance: Press the + icon and select Phone -> Send SMS

Use the following settings:
  • Number: *Use the number provided by your telecom operator at which the SMS needs to be sent.* eg. 55333 in case of Reliance communications.
  • Message: *Use the keyword provided by your telecom operator.* eg. MBAL in case of Reliance communications.


You're done! This profile will work daily at 11:45 pm and retrieve your call and data balances standing at the end of each day.

Tasker: One-Tap Wallpaper Changer

May 03, 2016
Introduction with today's project: A useful and easy setting-up tasker project, which will change your device's wallpaper with just a long-press of your home button.

The long press of the home button on any android device launches the Google Search/Google Now. Since many people do not use this feature, tasker can use this long press function to change your wallpapers.

If you use the Google search/Google Now with the home button(long press), you can still enjoy the changing of wallpaper but with a click on a shortcut on your home screen or by shaking your device(more battery consuming, hence not recommended).

PREREQUISITES:
  1. You'll need the app: Tasker (Please turn off beginner's mode in preferences).
  2. If you're using Marshmallow, you'll need to change the Device assistance app from Google to Tasker, from under default applications settings. (Go to settings-> Applications-> Default applications->Device assistance app->Device assistance app)
Here we'll divide the tutorial into two parts: A) Creating the task. B) Creating the trigger(profile).
  • If you don't use the home button to launch the google app, please follow both A and B part of the tutorial.
  • If you use the home button to launch the google app, follow Part A only and the Special steps* at the end of the article.

PART - A


Step 1: Move all your wallpapers in a folder "My Wallpapers" (anywhere on your device's internal or external storage with your file manager).

Step 2: Open the Tasker app. Long press on the Home icon at the bottom left and click on Add + and give your project a name. eg., Wallpaper Changer

Step 2

Step 3: Go to the Tasks Tab, Click on the '+' button at the bottom right and give a task name. eg., Wallpaper Switcher.


Step 3

Step 4: Click on the '+' button at the bottom and browse to Alert-> Flash and type "Changing Wallpaper" under text. Press the back button to save.


Step 5: Click on the '+' button at the bottom and browse to Variables-> Variable Set
  • Under Name type %randoimagefolder 
  • Under To *type the location of the folder in which your wallpapers are stored* 
    • eg. sdcard/Memory Card/My Wallpapers/
    • eg. emulated/storage/My Wallpapers/
[you can obtain this by checking the details/properties of your Wallpaper folder through your file manager.]
        • Press the back button to save.
        Step 5
        Step 6: Click on the '+' button at the bottom and browse to Java-> JavaScriptlet
        • Under Code type/paste the following code: 
        var i =listFiles(randoimagefolder, false).split("\n");
        var number = Math.floor( Math.random()*(i.length)); setWallpaper(i[number]);


        • Auto Exit - Checked.
        Step 6
        Step 7: Click on the '+' button at the bottom and browse to Task-> Stop. 

        Press back button to save.

        PART - B


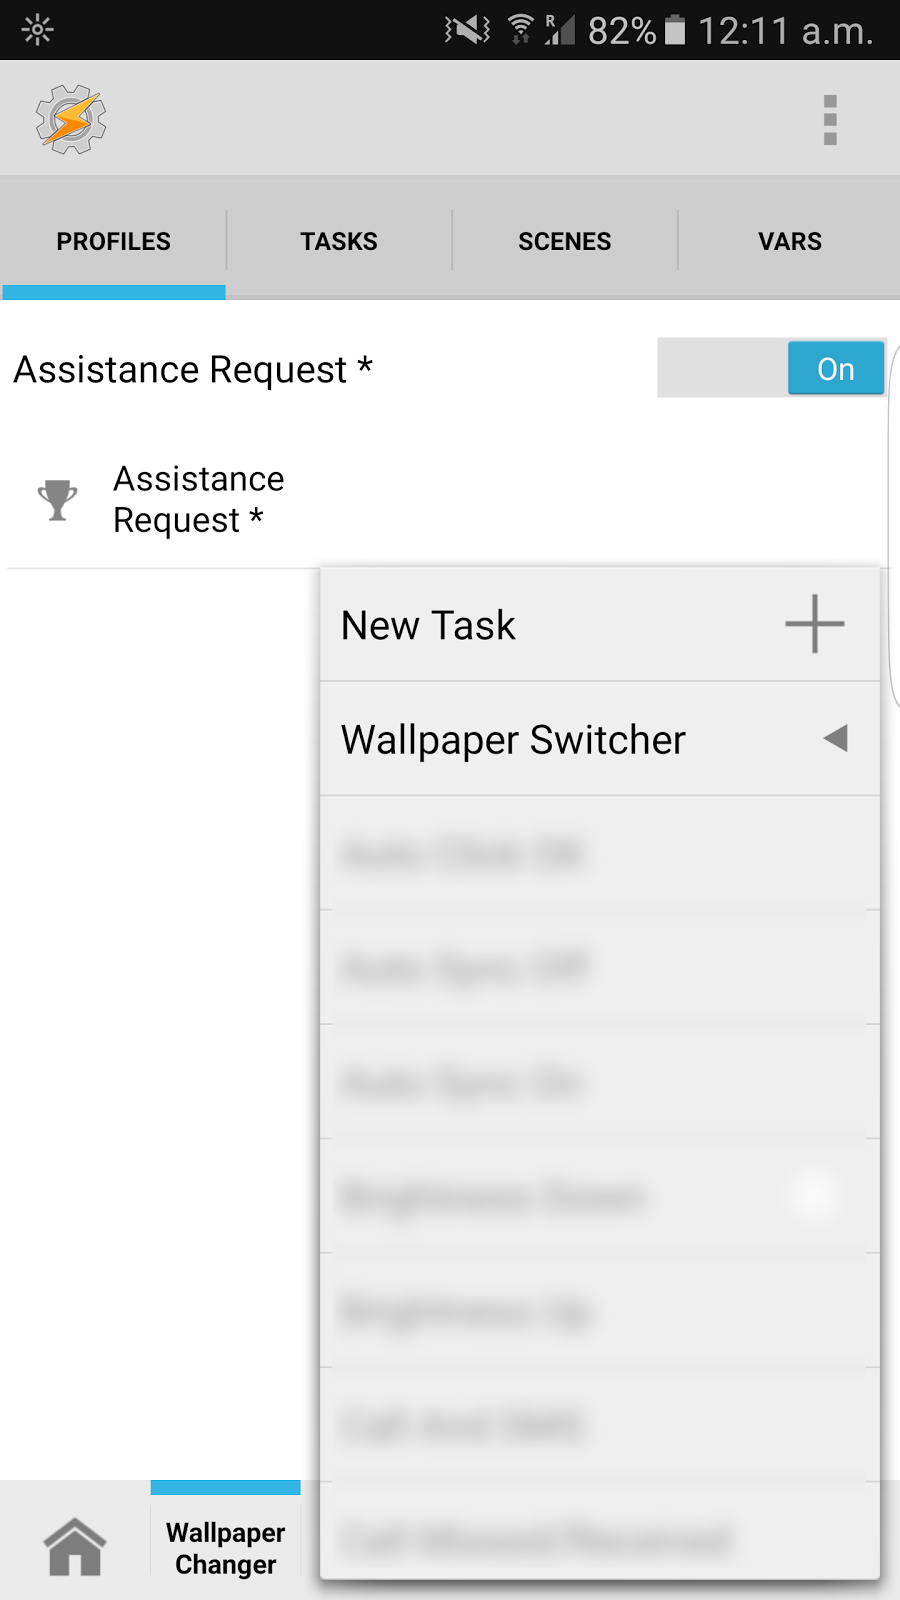
        Step 1: Go to the Profiles Tab, Click on the '+' on the bottom right and select Event-> UI-> Assistance Request. Press the back button to save.

        Step 2: From the popup list of tasks, select your above made task "Wallpaper Switcher".

        Part B: Step 2
        It's Done! Just exit from the tasker app and long press on the home button to see it work.

        ---

        *Special Steps: For people who don't want to lose the feature of long pressing to launch the google search app can just set up a shortcut on their homescreen to run the task. Follow these steps after completing the 7 Steps given above in Part A.

        Step 1: Click on the square grid icon at the bottom right and go to the Built-In Icons to select any desired icon. Press the back button to save. Exit from the tasker app.

        Step 2: Go to widgets menu in your device, Find the tasker widgets and select Task Shortcut out of the three.

        Step 3: From the list presented, Select your task "Wallpaper Switcher". Press back and exit from the app. 

        Now, you can enjoy changing your wallpapers by just clicking on the Shortcut Icon on your homescreen.

        ---
        Disclaimer: This blog/owner of this blog disclaims any/all of the damage/loss caused to you/your device/data/etc to the use of the above stated method. You agree to perform the above at your own complete risk.