Showing posts with label profile. Show all posts

Tasker: One-Tap Wallpaper Changer

May 03, 2016
Introduction with today's project: A useful and easy setting-up tasker project, which will change your device's wallpaper with just a long-press of your home button.

The long press of the home button on any android device launches the Google Search/Google Now. Since many people do not use this feature, tasker can use this long press function to change your wallpapers.

If you use the Google search/Google Now with the home button(long press), you can still enjoy the changing of wallpaper but with a click on a shortcut on your home screen or by shaking your device(more battery consuming, hence not recommended).

PREREQUISITES:
  1. You'll need the app: Tasker (Please turn off beginner's mode in preferences).
  2. If you're using Marshmallow, you'll need to change the Device assistance app from Google to Tasker, from under default applications settings. (Go to settings-> Applications-> Default applications->Device assistance app->Device assistance app)
Here we'll divide the tutorial into two parts: A) Creating the task. B) Creating the trigger(profile).
  • If you don't use the home button to launch the google app, please follow both A and B part of the tutorial.
  • If you use the home button to launch the google app, follow Part A only and the Special steps* at the end of the article.

PART - A


Step 1: Move all your wallpapers in a folder "My Wallpapers" (anywhere on your device's internal or external storage with your file manager).

Step 2: Open the Tasker app. Long press on the Home icon at the bottom left and click on Add + and give your project a name. eg., Wallpaper Changer

Step 2

Step 3: Go to the Tasks Tab, Click on the '+' button at the bottom right and give a task name. eg., Wallpaper Switcher.


Step 3

Step 4: Click on the '+' button at the bottom and browse to Alert-> Flash and type "Changing Wallpaper" under text. Press the back button to save.


Step 5: Click on the '+' button at the bottom and browse to Variables-> Variable Set
  • Under Name type %randoimagefolder 
  • Under To *type the location of the folder in which your wallpapers are stored
    • eg. sdcard/Memory Card/My Wallpapers/
    • eg. emulated/storage/My Wallpapers/
[you can obtain this by checking the details/properties of your Wallpaper folder through your file manager.]
        • Press the back button to save.
        Step 5
        Step 6: Click on the '+' button at the bottom and browse to Java-> JavaScriptlet
        • Under Code type/paste the following code: 
        var i =listFiles(randoimagefolder, false).split("\n");
        var number = Math.floor( Math.random()*(i.length)); setWallpaper(i[number]);


        • Auto Exit - Checked.
        Step 6
        Step 7: Click on the '+' button at the bottom and browse to Task-> Stop. 

        Press back button to save.

        PART - B


        Step 1: Go to the Profiles Tab, Click on the '+' on the bottom right and select Event-> UI-> Assistance Request. Press the back button to save.

        Step 2: From the popup list of tasks, select your above made task "Wallpaper Switcher".
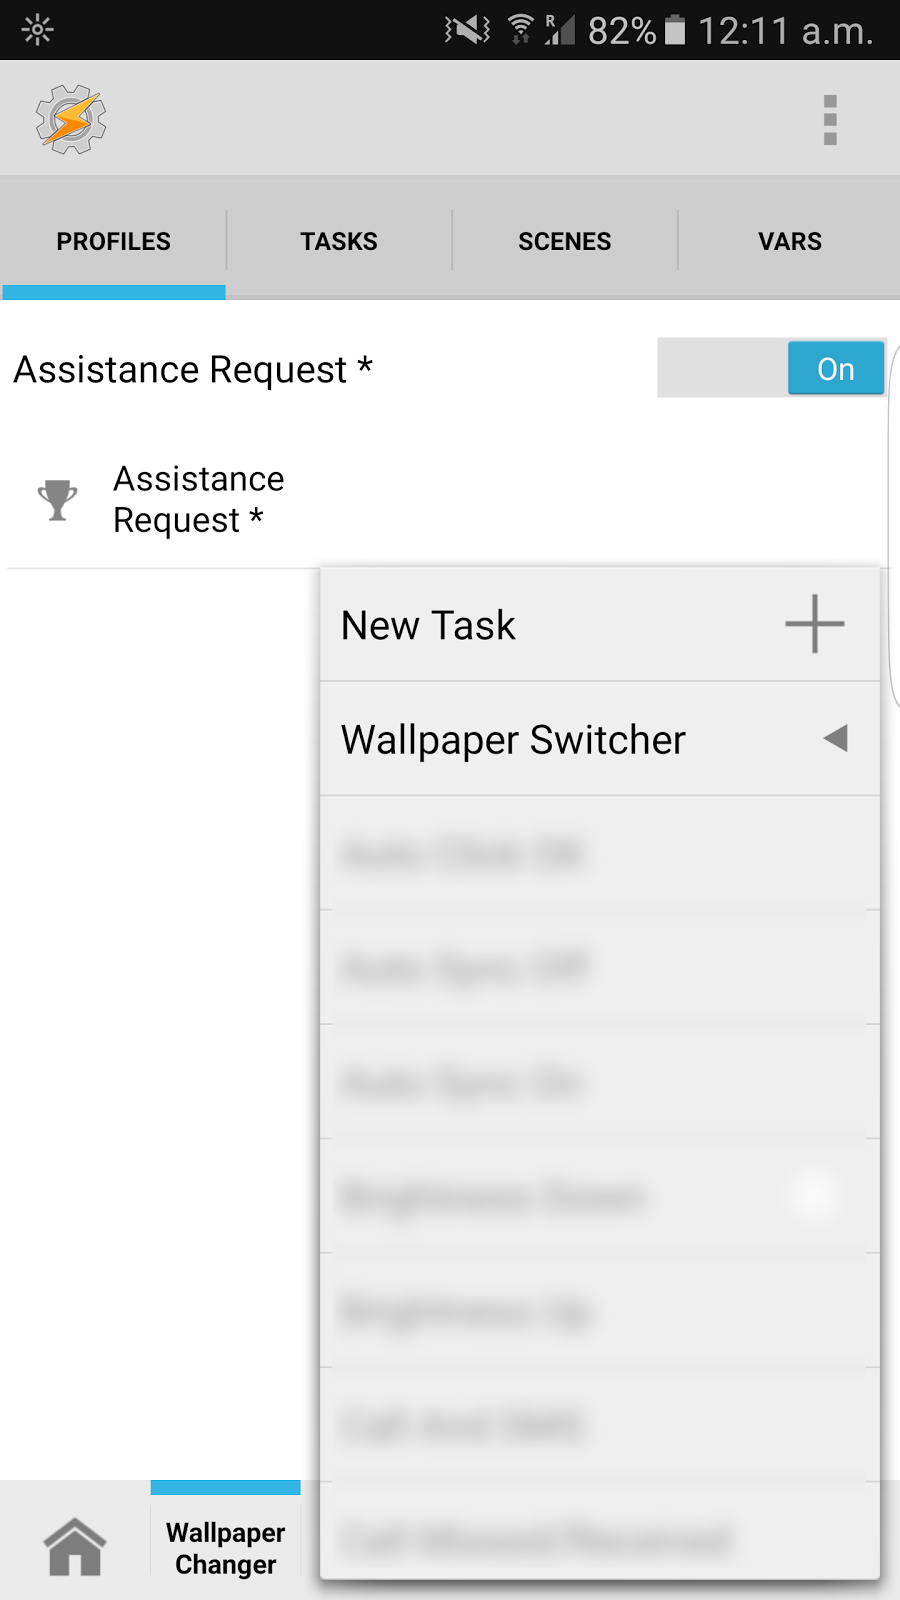
        Part B: Step 2
        It's Done! Just exit from the tasker app and long press on the home button to see it work.

        ---

        *Special Steps: For people who don't want to lose the feature of long pressing to launch the google search app can just set up a shortcut on their homescreen to run the task. Follow these steps after completing the 7 Steps given above in Part A.

        Step 1: Click on the square grid icon at the bottom right and go to the Built-In Icons to select any desired icon. Press the back button to save. Exit from the tasker app.

        Step 2: Go to widgets menu in your device, Find the tasker widgets and select Task Shortcut out of the three.

        Step 3: From the list presented, Select your task "Wallpaper Switcher". Press back and exit from the app. 

        Now, you can enjoy changing your wallpapers by just clicking on the Shortcut Icon on your homescreen.

        ---
        Disclaimer: This blog/owner of this blog disclaims any/all of the damage/loss caused to you/your device/data/etc to the use of the above stated method. You agree to perform the above at your own complete risk.

        Tasker: App Specific Screen Brightness [Very useful]

        April 22, 2016
        Introduction with today's project: An extremely simple yet immensely useful & convenient tasker project. This tasker project automates your android smartphone's screen brightness to act according to the app currently opened/used. 

        For example, the screen brightness will be increased when the camera or the gallery app is opened, to facilitate capturing of photos/videos & will be restored to the normal brightness state after the app is closed. This definitely makes capturing photos/selfies or videos a more enjoyable job! 

        This is extremely useful for people who don't keep their screen brightness at maximum, due to the ever insufficient battery life, but often feel the need to manually slide the brightness up, while clicking pictures or viewing the gallery or watching videos etc. After creating this tasker project, you'll never need to adjust the brightness level when using a particular app(s). You'll be able to predefine the level of brightness which will be applied when such apps are opened, and will revert to the regularly used(predefined) level of brightness once the apps are closed.

        PREREQUISITE: You'll need the app: Tasker (Please turn off beginner's mode in preferences)


        In a nutshell, it basically consists of 3 simple steps- Selecting the apps, Setting the increased brightness level & Setting the brightness level to return to, once the app is closed.

        Now let's get into a detailed tutorial.

        Step 1: Click on the '+' button at the bottom right corner and select 'Application'.

        Step 1
        Step 2: From the list of the apps, select the Camera & Gallery apps you use.
        (You can select more than one camera/gallery apps like retrica/beauty plus/camera 360 etc too). (Make sure only "App" is active at the bottom, while "Services" and " Invert" options are inactive.)
        Step 2

        Step 3: Click on "New Task +" and give it a name: "Brightness Up"

        Step 4: Click on the '+' button at the bottom and browse to Display -> Display Brightness.
        • Slide to set the value of Level to the maximum value possible (eg. 255). 
        • Click on the '+' button at If and type %BATT in the variable box, select "Maths: Greater Than" from the middle box and type 19 in the value box and press the back button. (refer image below)

          [by adding this IF statement, the screen brightness will be increased only if the battery is at least 20%. This acts as a power saving mode for this feature]
        Step 4

        Step 5: Click on the '+' button at the bottom and browse to Task-> Stop. Press the back button.
        After completing Step 4 and 5


        Now, exit from tasker app & make sure your phone's screen brightness it set as you always want it to be.

        Step 6: Open tasker. You should be on the PROFILES tab/page; Long press on the Task Brightness Up and select Add Exit Task.

        Step 6
        Step 7: Click on "New Task +" and give it a name: "Brightness Down"

        Step 8: Click on the '+' button at the bottom and browse to Display -> Display Brightness. (DO NOT change the value of Level this time)

        Step 9: Click on the '+' button at the bottom and browse to Task-> Stop. Keep pressing the back button until you exit from the tasker app.

        After completing Step 8 and 9

        Make sure everything looks like the image below this at this stage.

        Everything should look like this

        You're Done! Just open your camera app & test it. It should work perfectly. If you have any issues, feel free to use the contact us form.


        ---

        Disclaimer: This blog/owner of this blog disclaims all/any of the damage/loss caused to you/your device/data/etc due to use of the above stated method. You agree to perform the above at your own complete risk.

        New Fresh Creative Whatsapp / Facebook Profile Pictures / DP for your social needs!

        June 13, 2014

        New Fresh Creative Whatsapp Facebook Profile Pictures / DP for your social needs!


        Whatsapp Profile DP- Merry Christmas
        Whatsapp Profile DP- Merry Christmas
         
        Whatsapp Profile DP- Happy New Year 2015
        Whatsapp Profile DP- Happy New Year 2015


        Whatsapp Profile DP- Happy Halloween

        Whatsapp DP- Examination!

        Whatsapp Profile DP- Hot Sunner Weather

        Whatsapp DP- Examination! 
        Whatsapp Profile DP- Diwali Indian Festival
        Whatsapp Profile DP- Diwali Indian Festival

        MORE COMING SOON.. CHECK OUT BEFORE EVERY OCCASION FOR MORE! :D

        © RISHABH GUPTA. The copyright information written on the images must not be cropped or removed. You can use the images for non-commercial use but with proper credits & back link to this page. No commercial use of the images is allowed without written permission from the copy right owner. Failing these terms will call for Legal Actions.